Creating fully responsive websites with editable content is often made easy with the use of Display Suite or Panels. These modules allow us to build customized layouts which often incorporate code from a responsive framework such as Zurb's Foundation or Bootstrap.
When developing with this model we often run into the problem of the content editor being locked in to predetermined layouts. This is where the WYSIWYG Template module becomes a super-handy addition to the WYSIWYG editor. (Special thanks to Jen Lampton for getting this started.)
Installing the WYSIWYG Template Module
The WYSIWYG Template module allows you to create any code template which can be inserted into the WYSIWYG editor by any content manager. This is useful if you want to allow someone to insert layout-specific code without knowing any HTML. There are a couple of tricks that you can utilize to enhance this experience which will be detailed shortly. To get started, you need to download and install the WYSIWYG Editor module into your Drupal website. If you're not sure how to do that, follow these instructions.
Once you have the module installed and enabled, be sure to enable the WYSIWYG Template button inside your WYSIWYG editor. If you do not do this, you will not be able to insert any of your awesome customized WYSIWYG Templates! If you've done this correctly, you should see a button in your WYSIWYG Editor that looks like the screenshot above.
WYSIWYG Template Button
Once this is enabled, head over to the template configuration page located at ""/admin/config/content/wysiwyg-templates."" From here you can build your own templates. Anything that you add in a template can be inserted inside of any body text. On our example site, we've included various responsive grid layouts, such as 25/75, 50/50, 3 column and 4 column layouts. This is great because the client can easily insert responsive code anywhere in the body of this page without knowing how to code. Also, this enables them to create unique layouts which they may require on a special page.
If you're using Zurb's Foundation framework, you can import some of our WYSIWYG templates into your Drupal 7 site to get started. Simply copy/paste the code inside the .txt files into the WYSIWYG Template's import screens.
Once you've created or imported some templates and you've gotten the button to appear inside your WYSIWYG editor, you should be able to insert your WYSIWYG Templates directly into the editor. You can scroll through your templates and choose which to insert into the editor.
Going the Extra Mile
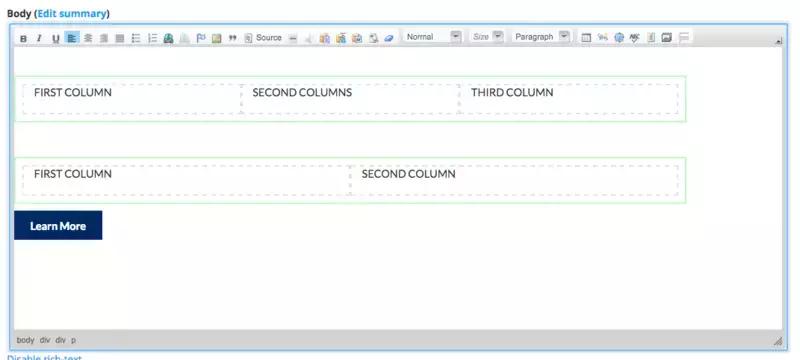
By this point, you should have been able to get the WYSIWYG Template module installed and working. While working with the module, we found some ways we could improve the experience. Considering many of the templates we utilized were simply placing Foundation markup into the WYSIWYG editor, there wasn't much to visually see in the editor's screen. To improve the experience, we created some CSS that only applies to our CKEditor. This way, the content manager can easily see any Foundation row or column. This a necessity because without it, the content editor won't know which column they are working in. If you properly configure the WYSIWYG editor to use a custom stylesheet, you can make custom layouts appear like this inside the editor:
Selecting elements inside the WYSIWYG helps show the content editor which columns they are working in.
Another great tip for turning this from pretty cool to totally awesome is to add some space above and below your templates. If a content editor decides to insert two WYSIWYG templates back to back and they are primarily <div> containers, they will have a difficult time trying to insert anything in between the two templates. At the beginning and end of all the WYSIWYG Templates we've created, we add in <p> </p>. In the example above, you can see how there is some separation between the green boxes. This gives our content editor space to click and add something. Alternatively, it can be deleted if necessary.
Unearth Our Day Hikes
Information Request
Please fill out the information below.
Schedule A Meeting
Please fill out the information below.
Schedule a Phone Call
Please fill out the information below.
Information Request
Please fill out the information below.
Submit a Request or RFP
Please fill out the information below.
